

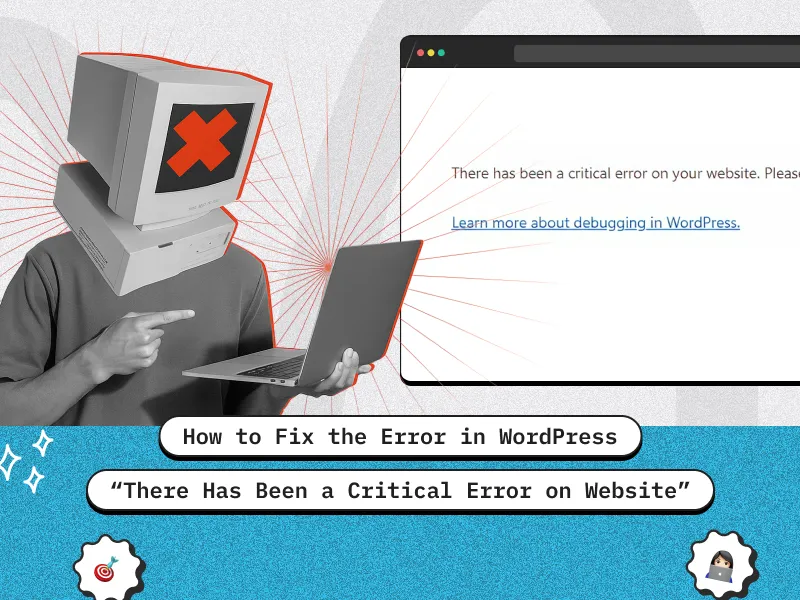
TL;DR
The “There has been a critical error on your website” message in WordPress usually means something went wrong with your theme, plugin, PHP memory, or server configuration. To fix it:
- Enable WordPress debug mode.
- Check error logs for the root cause.
- Disable faulty plugins or themes.
- Increase the PHP memory limit.
- Re-upload core WordPress files.
- Use the Recovery Mode link sent via email.
- Restore a backup or contact hosting support if needed.
Introduction
Few things are more alarming for a website owner than seeing the dreaded message “There has been a critical error on your website.” It usually appears out of nowhere, locking you out of your WordPress dashboard and leaving your visitors staring at a blank screen.
This error signals that something fundamental has gone wrong often due to a faulty plugin, broken theme, memory exhaustion, or server configuration issue. While it looks intimidating, the good news is that it’s completely fixable with the right steps.
In this guide, we’ll walk you through how to diagnose and resolve the WordPress critical error, even if you can’t access your admin panel. And if you ever need professional help restoring or optimizing your site, consider partnering with an experienced WordPress development company that specializes in secure, high-performance website maintenance and recovery.
By the end of this article, you’ll know exactly how to bring your site back online and prevent this problem from happening again.
What is the “There Has Been a Critical Error on Your Website” Error?
If you’ve ever seen the WordPress critical error screen, you know how frustrating it can be. Instead of your website, visitors are greeted with this scary message:
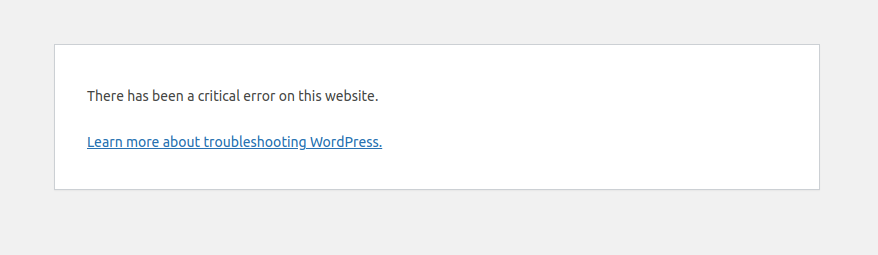
This error occurs when WordPress encounters a fatal PHP error that it cannot recover from. Common causes include: Conflicting or broken plugins, A faulty or outdated theme, Low PHP memory limit, an Incompatible PHP version, corrupted WordPress core files, and Wrong file permissions.
Since WordPress 5.2, the system includes a built-in Fatal Error Handler that tries to catch these issues and even sends a Recovery Mode email to the admin.
Not Sure Where the Error Is Coming From?
Don’t spend hours debugging — our experts can fix your WordPress issue in minutes.

Step-by-Step Guide to Fixing the Critical Error
Now that you know the causes, let’s walk through solutions in the correct order:
1. Enable Debug Mode
The first thing you should do when facing the “critical error” message is to enable WordPress debug mode. By default, WordPress hides technical errors to keep the site looking clean, but that also means you don’t know what’s going wrong. Turning on debug mode reveals those hidden details.
This step helps you identify the cause of the error, whether it’s a plugin conflict, a missing file, or an issue within your theme. Instead of guessing, you’ll see the exact file and line of code where the problem occurs.
Once enabled, debug mode can log errors into a file (debug.log) so you can review them safely without showing visitors messy error messages. The key benefit here is clarity: you’ll know the root cause of the issue.Open your wp-config.php file and add/edit the following lines before the line that says “That’s all, stop editing!”:
define( 'WP_DEBUG', true );
define( 'WP_DEBUG_LOG', true );
define( 'WP_DEBUG_DISPLAY', false );
This ensures errors are saved to wp-content/debug.log but not displayed to visitors.
If the debug.log file does not appear in your wp-content/ folder, it may be due to incorrect file permissions. Make sure:
- The wp-content/ folder has 755 permissions.
- Files inside it (like debug.log) have 644 permissions.
This gives WordPress enough access to create and write the log file, without making your server insecure.
2. Disable All Plugins
Sometimes, a faulty or outdated plugin is the reason behind the “There has been a critical error on your website” message. Since plugins add extra functionality to WordPress, a single conflict or bad update can break the whole site.
The quickest way to check this is to disable all plugins at once. If the site starts working again, you’ll know the issue is plugin-related. From there, you can reactivate them one by one until the error reappears; that’s how you find the culprit.
How to Disable Plugins Without Dashboard Access
- Connect to your site using FTP or your hosting’s File Manager.
- Navigate to /wp-content/ and rename the plugins folder to plugins_old.
- This instantly deactivates all plugins.
- Rename the folder back to plugins and then activate plugins one by one from the dashboard to identify the faulty one.
If the site loads after renaming the folder, you’ve confirmed a plugin conflict is causing the critical error.
Read More: Why Custom WordPress Plugin is better for your Business
3. Switch to a Default Theme
Themes control how your site looks, but they also contain PHP code. If your active theme has a bug, a missing file, or compatibility issues with WordPress/PHP, it can trigger the critical error.
To test this, you can force WordPress to fall back to one of its default themes (like Twenty Twenty-Four). This helps you quickly check if the problem lies in your theme’s code.
How to Switch Without Dashboard Access
- Connect via FTP or your hosting File Manager.
- Go to /wp-content/themes/ and rename your active theme’s folder (e.g., mytheme → mytheme_old).
- WordPress will automatically activate a default theme if it’s available.
If your site loads after switching, the error is caused by your theme. You can then reinstall, update, or fix the faulty theme files.
Read More: Why Custom WordPress Theme is better for your Business
4. Increase PHP Memory Limit
Sometimes the “critical error” isn’t caused by broken code at all. It’s simply because WordPress ran out of memory. Plugins, themes, and even large media files can use up your server’s allocated PHP memory. When the limit is too low, WordPress crashes and shows the critical error message.
By increasing the PHP memory limit, you give WordPress more resources to handle heavy processes and prevent crashes. The recommended minimum is 256M for most modern sites.
Ways to Increase PHP Memory
a) Edit wp-config.php
Add this line above the line “That’s all, stop editing!”:
define( 'WP_MEMORY_LIMIT', '256M' );b) Update .htaccess
Inside your site’s root .htaccess file, add:
php_value memory_limit 256Mc) Change php.ini (If accesible)
In your server’s php.ini file, set:
memory_limit = 256MIf memory was the issue, your site should stop crashing once the limit is increased. If not, it means something else (like faulty code) is causing the error.
5. Re-upload Core WordPress Files
Sometimes WordPress core files get corrupted, maybe during an update, due to a bad upload, or even server issues. When that happens, the system can’t run properly, and you’ll see the critical error message.
A safe way to fix this is to re-upload the official WordPress core files. Don’t worry — this won’t touch your themes, plugins, or media uploads. It simply replaces the core system files with fresh, working ones.
How to Re-upload WordPress Core Files
- Download the latest WordPress version from wordpress.org.
- Extract the ZIP file on your computer.
- Using FTP or File Manager, upload and replace the /wp-admin/ and /wp-includes/ folders on your site with the new copies.
If a corrupted or missing core file was the cause, this will restore WordPress back to a clean state without affecting your content or design.
6. Upgrade or Switch PHP Version
Sometimes a critical error happens because your site is running an older PHP version that’s not fully compatible with WordPress, themes, or plugins. Newer versions of WordPress and many modern plugins require PHP 8.0 or higher. Using an outdated version can trigger fatal errors, unexpected behavior, or even prevent your site from loading.
Upgrading PHP ensures your site runs efficiently, securely, and is compatible with the latest code. Most hosts allow you to upgrade PHP from the control panel (like cPanel) or via command line if you have server access. Always check that your active theme and plugins support the new PHP version before switching.
How to Upgrade PHP
- In cPanel: Look for PHP Selector or MultiPHP Manager and select a newer version (8.0, 8.1, etc.).
- Via command line: Use your host’s instructions to switch the PHP version safely.
If the critical error was caused by an incompatibility with PHP, upgrading will restore your site and improve performance, while also keeping it secure and future-proof.
7. Fix File Permissions
File permissions control who can read, write, or execute files and folders on your server. If they are set incorrectly, WordPress may not be able to read or write necessary files, which can lead to critical errors or prevent logs like debug.log from being created.
Setting correct permissions ensures that WordPress can function properly while keeping your site secure. Overly permissive settings (like 777) can make your site vulnerable to hackers, while overly strict settings can break normal operations.
Recommended WordPress Permissions
- Folders: 755 → allows WordPress to access directories safely.
- Files: 644 → readable by the server, only editable by the owner.
Correct permissions allow WordPress to read and write files it needs, create logs, and execute plugins/themes safely, reducing the chance of critical errors.
8. Recovery Mode via Email
When a critical error occurs, WordPress may trigger Recovery Mode, which allows you to log in safely even if the site is broken. In many cases, WordPress sends a special recovery email to the site administrator with a link to enter this mode. This is particularly useful if you cannot access the dashboard normally.
Recovery Mode temporarily deactivates the plugin or theme causing the problem while letting you log in and fix the issue. This means you can troubleshoot without making the site completely inaccessible to visitors. It’s a safe way to identify the faulty plugin or theme without guessing.
How it works
- WordPress sends a recovery email to the admin address listed in your site settings.
- Clicking the link logs you in with a temporary session that bypasses the critical error.
- You can then deactivate the problematic plugin or switch themes directly from the admin panel.
Using recovery mode helps you quickly pinpoint and fix the source of the critical error while keeping your site partially accessible, reducing downtime and avoiding unnecessary frustration.
9. Roll Back Your Site and Clear Caching
Sometimes, a recent update to WordPress, a theme, or a plugin can introduce a critical error. In such cases, rolling back to a previous stable version can quickly restore your site. Rollbacks give you a safe way to undo problematic changes without losing your content, while you investigate the cause.
Caching can also play a role in errors. Cached files may still serve old or incompatible code even after fixing a plugin or theme, which can make it seem like the problem persists. Clearing all caches, including browser cache, plugin cache (like W3 Total Cache or LiteSpeed Cache), and server-level cache, ensures that WordPress runs the latest code.
How to Rollback and Clear Cache
- Use a backup to restore WordPress, a theme, or a plugin to a previous working version.
- Clear caching plugins from their settings page.
- If your host provides server-level caching, clear it from the hosting dashboard.
- Ask users or your team to refresh their browser cache as well.
After rolling back and clearing caches, the site will load the corrected files without interference from old cached versions, often resolving critical errors caused by updates or conflicts.
10. Contact Hosting Support
If you’ve tried everything and the error persists, your hosting provider’s support team should be your next step. Hosting teams have direct access to server logs, configurations, and PHP settings that you can’t always reach.
Need Expert Help to Fix Your WordPress Site?
Hire certified WordPress developers who can debug, optimize, and secure your website fast.
Prevent Future Critical Errors
Once fixed, here’s how to avoid running into this nightmare again:
- Keep WordPress Core, Themes, and Plugins Updated.
- Use a Staging Site before making changes.
- Install Security Plugins (Wordfence, iThemes Security).
- Monitor Error Logs Regularly.
- Avoid Nulled Plugins/Themes (often have malware).
- Backup Your Site Frequently (use plugins like UpdraftPlus or hosting backups).
- Choose Reliable Hosting optimized for WordPress.
Conclusion
The “There has been a critical error on your website” message may look intimidating, but it’s not the end of the road. With the right steps—enabling debug mode, checking error logs, deactivating faulty plugins, or restoring from a clean backup—you can bring your site back to normal quickly and safely.
If you’d rather not spend hours troubleshooting or risk downtime, it’s wise to work with professional WordPress developers who can diagnose and fix such issues efficiently. They can also help you strengthen your website’s performance, security, and uptime, so these errors don’t return.
Ready to get expert help? Book a 30-minute free consultation to discuss your website’s challenges and get tailored solutions to keep your WordPress site running smoothly
FAQ’s
Q1: What causes the critical error in WordPress?
A: The most common causes include plugin conflicts, theme issues, corrupted core files, low PHP memory limits, or running an outdated PHP version. Sometimes incorrect file permissions or incomplete updates can also trigger the error. Since the error message itself doesn’t reveal the cause, you need to dig deeper using debugging tools.
Q2: How do I identify the source of the critical error?
A: Start by enabling debug mode in your wp-config.php file. This logs errors into debug.log, showing the exact file and line where the issue occurs. You can also check your server’s PHP error logs for more details. If Recovery Mode email is enabled, it will highlight the faulty plugin or theme directly. This step removes guesswork and gives you a clear starting point for fixing the issue.
Q3: How do I enable Recovery Mode if I didn’t get the email?
A: If you don’t receive the Recovery Mode email, first make sure SMTP is properly set up so WordPress can send emails reliably. If email still isn’t working, enable WP_DEBUG_DISPLAY in wp-config.php. This will display the Recovery Mode link directly on the critical error page, allowing you to access your site safely even without email.
Q4: Can increasing PHP memory fix this error?
A: Yes. Many critical errors occur because WordPress hits the default memory limit (often 64M or 128M). By increasing the PHP memory limit to at least 256M, you give your site more resources to run heavy plugins, themes, and processes without crashing. If the error disappears after increasing memory, it confirms that low memory was the problem.
Q5: Will re-uploading WordPress core files delete my site?
A: No, re-uploading core files does not affect your content. When you replace the /wp-admin/ and /wp-includes/ folders with fresh copies from WordPress.org, only the system files are restored. Your themes, plugins, uploads, and database remain safe. This method is especially effective if an update failed or core files were corrupted.
Q6: How do I know if it’s a plugin or theme issue?
A: To test plugins, disable them all by renaming the /plugins/ folder. If your site works again, reactivate plugins one by one until the error returns. If plugins are not the issue, switch to a default WordPress theme by renaming your active theme’s folder. If the site loads with the default theme, the problem lies in your theme. This process quickly isolates the cause.
Q7: How can I prevent this critical error from happening again?
A: Regular maintenance can greatly reduce the chances of encountering critical errors. Keep WordPress core, themes, and plugins updated to their latest versions. Use only trusted plugins and themes, and avoid mixing incompatible code. Monitor PHP memory usage and upgrade your hosting environment when needed. Additionally, consider using a security plugin to prevent malicious code and always maintain regular backups, so you can quickly restore your site if something goes wrong.


 30 mins free Consulting
 8 min read

 Honk Kong
 UK
UK 
 USA
USA 


 Love we get from the world