

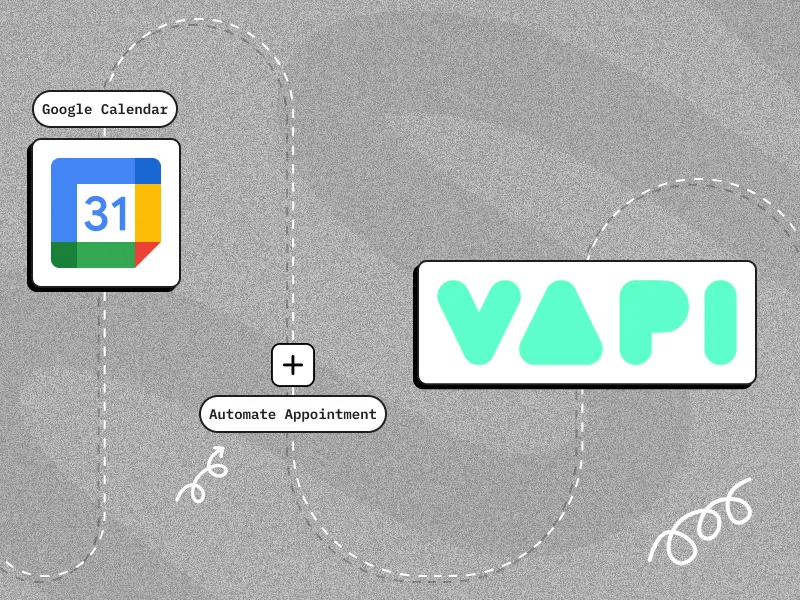
Monika’s life was a constant juggle of work calls, client meetings, and personal errands. Her days blurred together in a whirlwind of scheduling emails and forgotten appointments. One evening, overwhelmed by a mountain of confirmation emails, she discovered Vapi.ai. That’s when an idea sparked to life — what if she had a voice assistant to handle her appointments?
Intrigued, Monika dove headfirst into Vapi.ai. The user-friendly interface made it easy to get started, but Monika wasn’t satisfied with just the basics. She wanted something more powerful. That’s when she turned to OpenAI, the AI powerhouse. With its help, she integrated natural language understanding into her assistant. Now, instead of typing out commands, she could simply say, “Schedule a meeting with John for tomorrow at 2 pm,” and like magic, it appeared in her Google Calendar.
But the story didn’t end there. Enter Make.com, the automation wizard. With Make.com, Monika crafted seamless workflows for sending automatic confirmations. Her voice assistant was now fully operational, and her days began to change dramatically.
No more endless scheduling nightmares! With a simple voice command, appointments were whisked into her calendar, and automated workflows ensured everyone stayed informed. Time, once her greatest enemy, had become her most valuable ally.
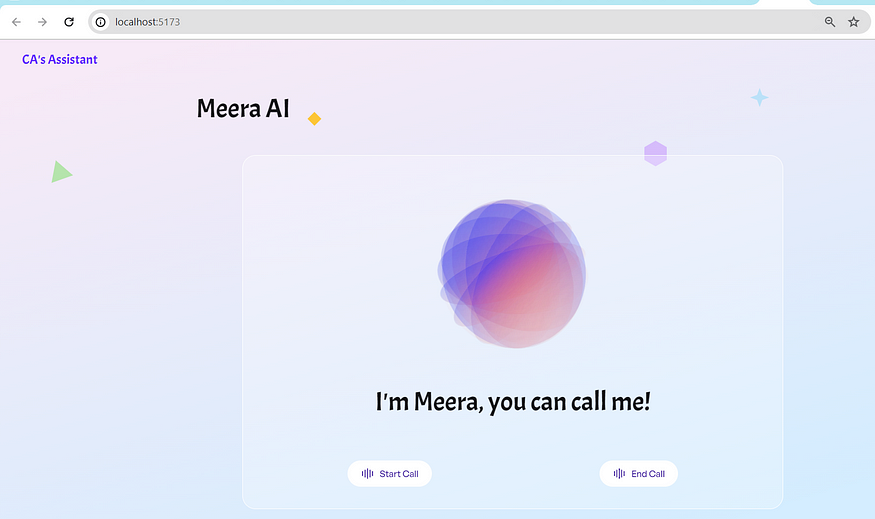
In the above image, you can see Meera assisting you with your appointments. Meera not only schedules your meetings but also answers your questions with relevant information. She can tell you which time slots are available in your calendar and share details about her previous work experiences.
Ready to get started? Follow these steps:
Step 1: Visit Vapi.ai and create your free account. You’ll receive a $10 credit in your account (subject to change in the future).
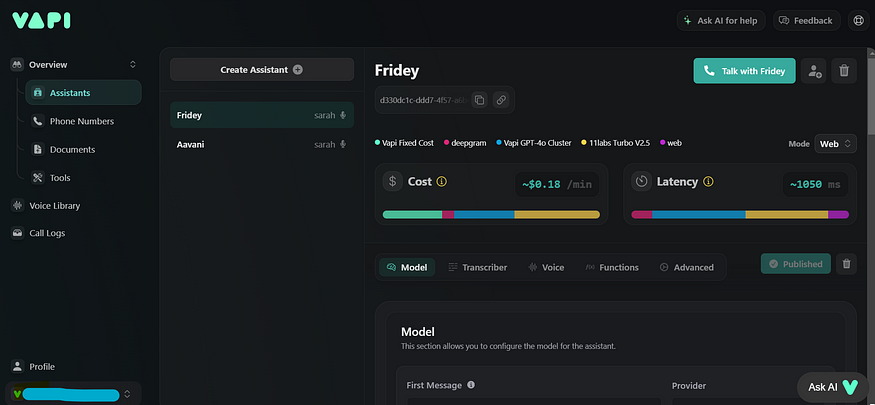
Inside the Overview, click on Assistance, there you’ll see on the top “Create Assistance” click on it. Name your assistance as I have given Fridey.
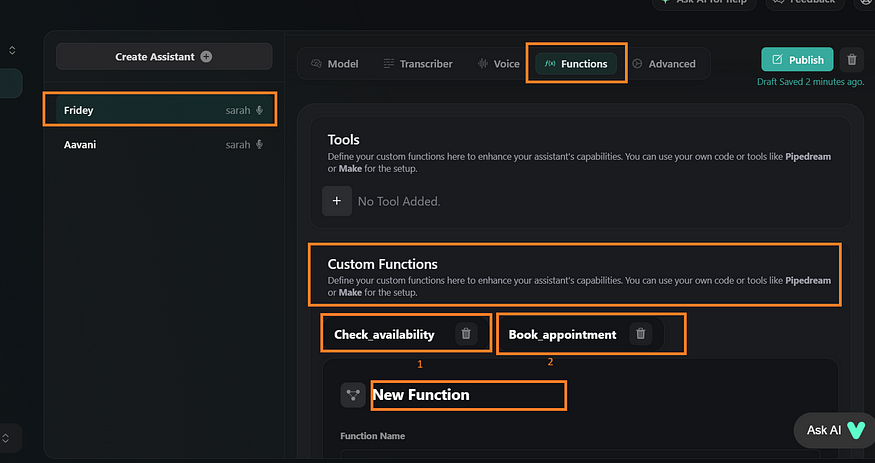
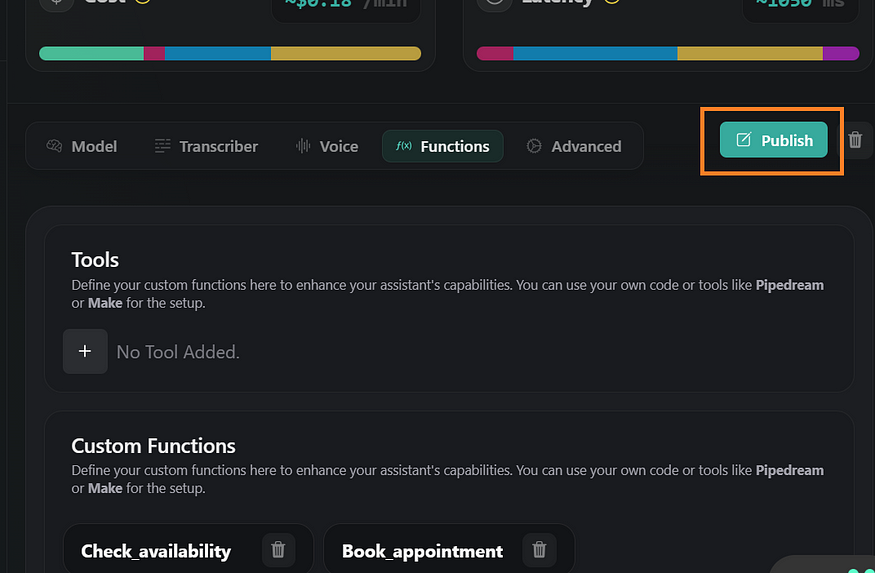
As shown in the above image, click on Assistance then click on “Functions”
there you’ll see “Custom Functions”. We’ll need to create two function
- Check_availability : This one is for checking if the Google calendar has an available slot for a new appointment on the customer’s requested date.
- Book_appointment : This is for once we are good with the date and time slot, go ahead and book the appointment
We’ll see how Vapi will execute this. (Exciting right 🎊, walk with me).
In the process of creating the function pass further properties as I have shown in the down below:
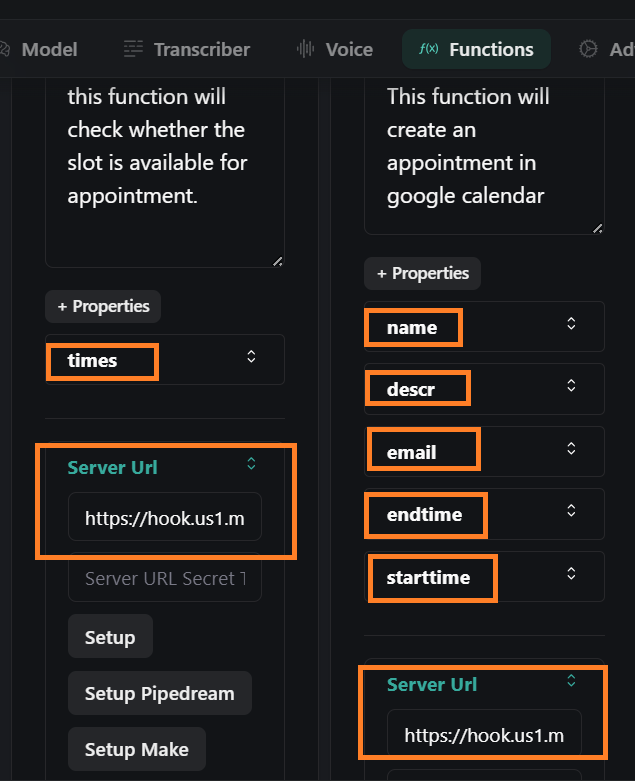
Now you can see I’ve added the server URL too, right? First Understand the architecture of this.
Architecture and Design :

Our React App is connected to VapiAI through the NPM package provided by Vapi itself, then based on the functions that we created in Vapi, we will execute on the User’s request, in the conversation with Vapi’s assistance.
The server URL that we provided in the functions is Make.com’s URL where our backend is working (Make.com is helping to build the automation)
Step 2: Let’s do backend automation.
Create an account on Make.com and create two scenarios as shown in the below picture.
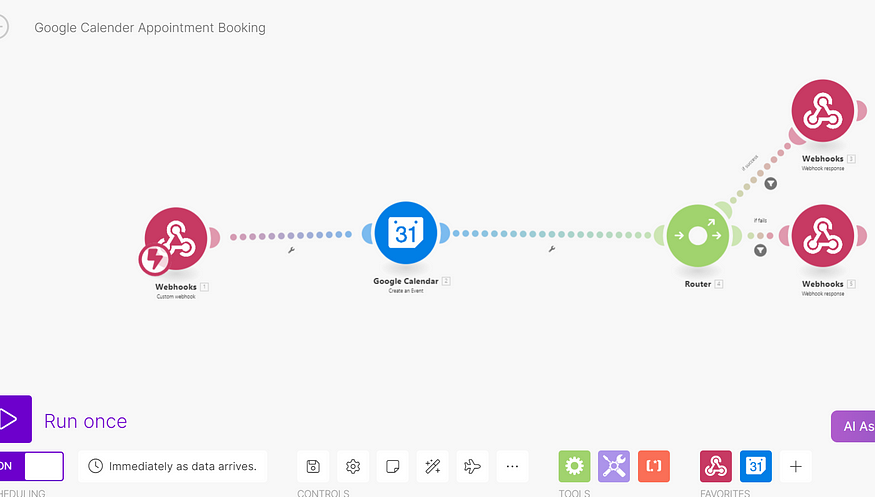
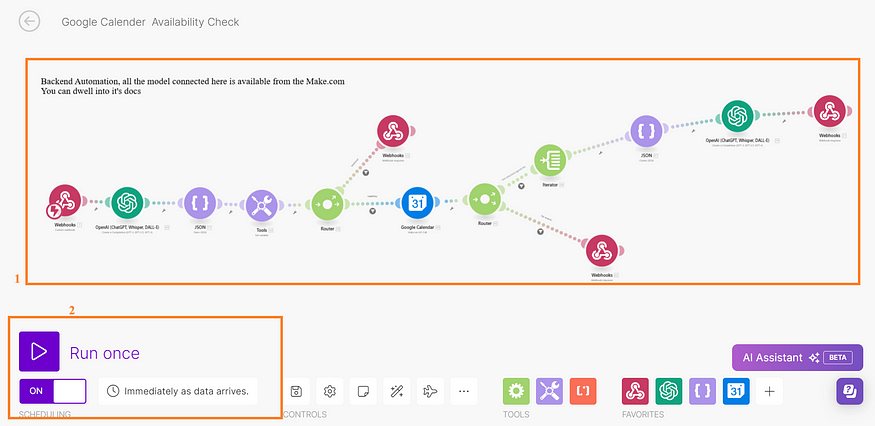
This above scenario is for checking availability in Google’s calendar. and below is for making an appointment in the calendar. you can download both pre-created from here and upload them into the scenarios one after another.
set your scenario, how they would run. As you can see in the picture I’ve set it up on “Immediately as data arrives” and my scheduling is on.
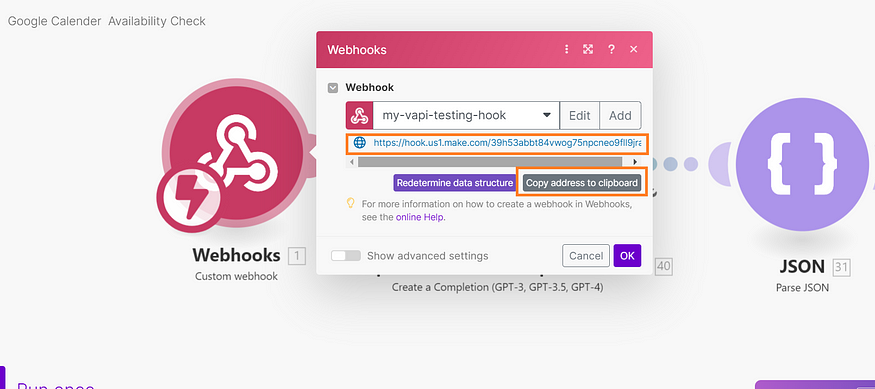
As shown in the picture above, click on the webhook copy that URL, and paste it into the Server URL in the Vapi dashboard in the Function area.
Both functions will have URLs from separate scenarios you uploaded in your scenario.
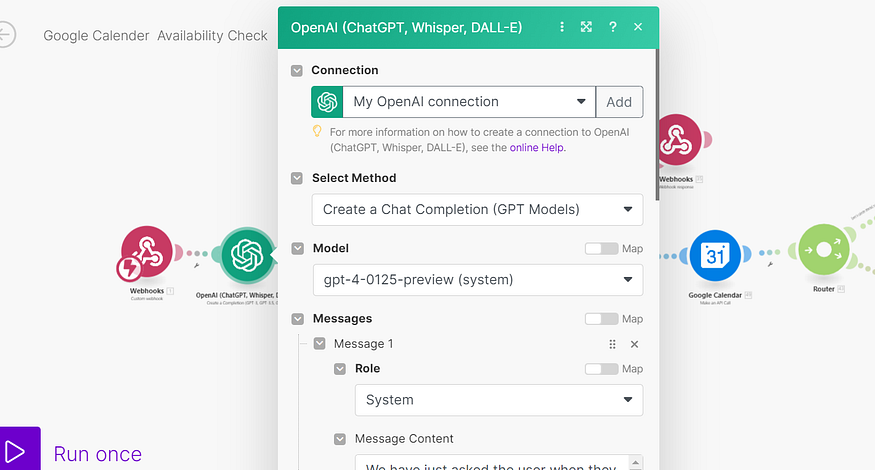
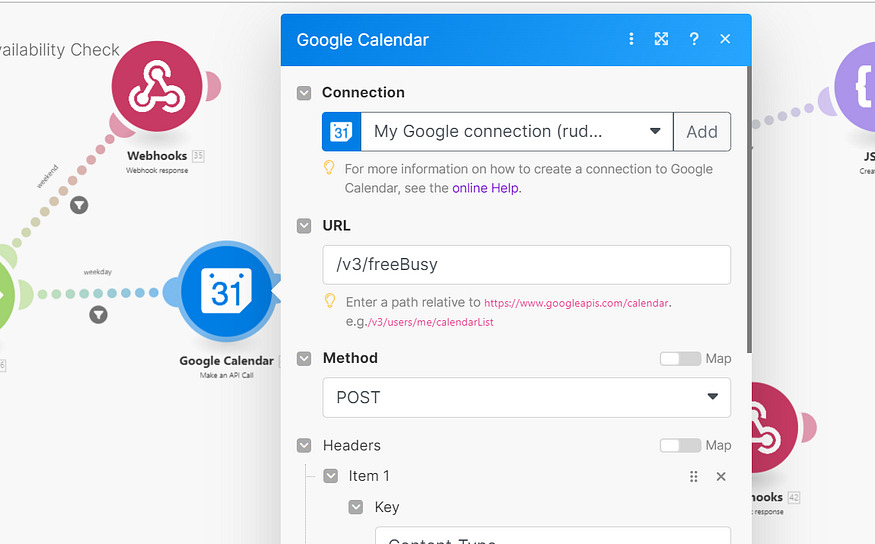
Step 3: Do the same with OpenAI and Google Calendar, click on the model, and add the authentication of your account.
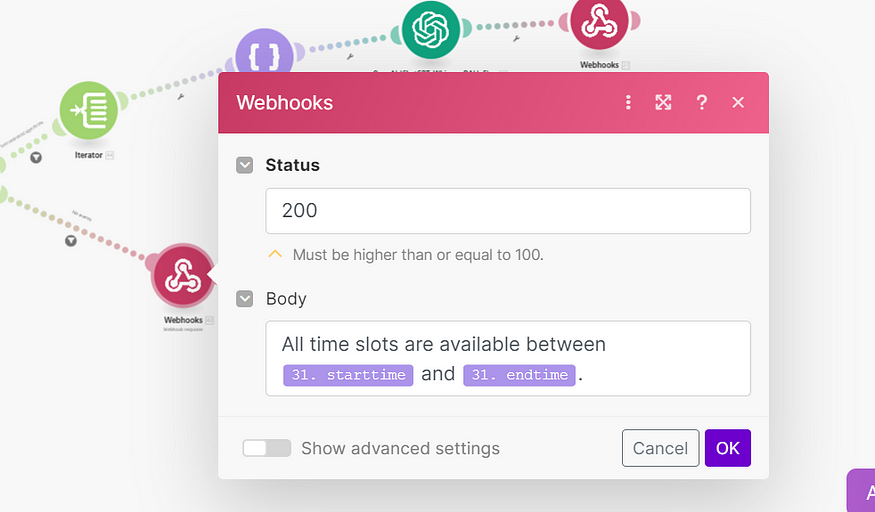
you are free to write the routes and webhook’s response to our application, as shown below. you can put the status code and in the body you add your custom message
Step 4: Now come to Vapi, where we had left off, once you added the server URL, test it once on both functions, once you click on the “Setup Make” button in the server URL section
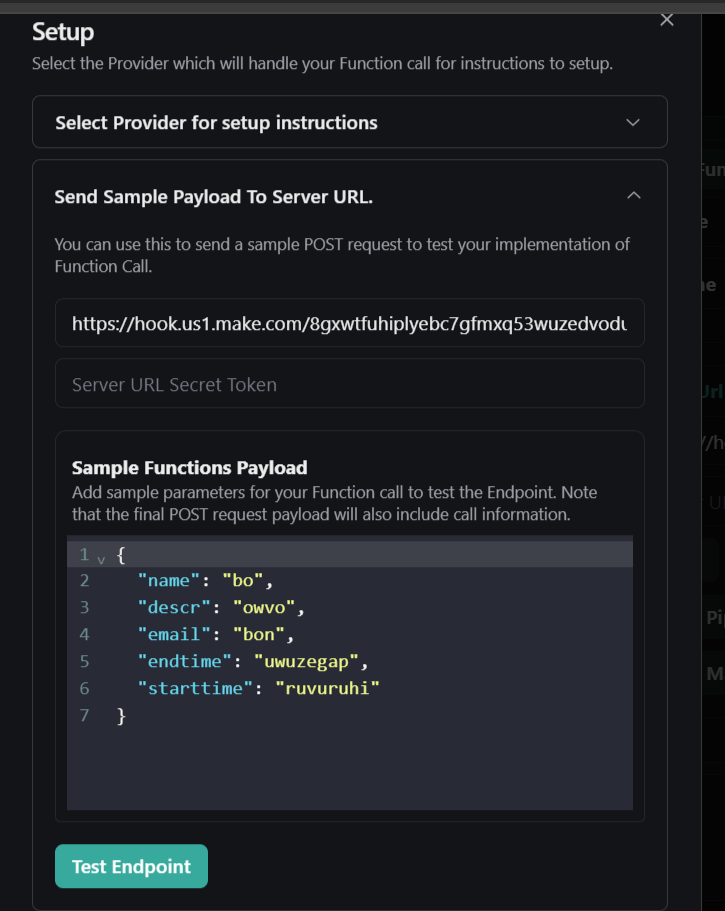
click on Test Endpoint and check whether your backend Make.com automation is working or not, enter the valid email, endtime, and starttime. Then click on the publish button as shown in the below picture.
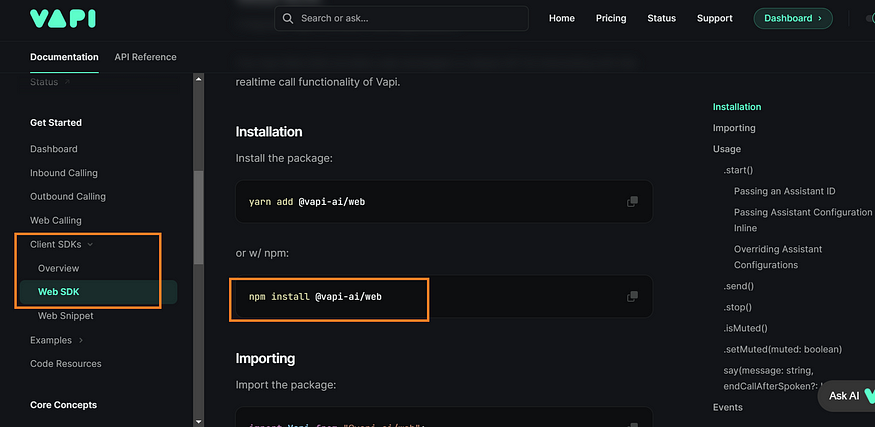
Step 5: Now it’s time to integrate the Vapi with our ReactJS App. As shown in the image below install the npm in react
then I’ve designed and as per my requirement built up the logic, you can read my code below
import sound from '../../assets/sound.svg';

import ellipse from '../../assets/Ellipse 5.svg';

import polygone1 from '../../assets/Polygon 1.svg';

import polygone2 from '../../assets/Polygon 2.svg';

import star1 from '../../assets/Star 1.svg';

import star2 from '../../assets/Star 2.svg';

import Vapi from '@vapi-ai/web';

import {  useRef, useState } from 'react';

import Lottie from "lottie-react";

import siriAnim from '../../lotties/siri-anim.json';

const vapi = new Vapi(import.meta.env.VITE_REACT_APP_VAPI_PUBLIC_API as string); // Vapi public key

enum CALLSTATUS {

 VOID,

 CONNECTING,

 LISTENING,

 SPEAKING,

 CALLSTOP

}

export default function MeeraAssistance() {

 const [isListening, setIsListening] = useState(CALLSTATUS.VOID);

 const lottieRefs:any = useRef();

 const startCall = () => {

   vapi.start(import.meta.env.VITE_REACT_APP_VAPI_ASSISTANCE_ID as string); // assistance ID

   setIsListening(CALLSTATUS.CONNECTING);

 };

 const stopCall = () => {

   vapi.stop();

   setIsListening(CALLSTATUS.CALLSTOP);

 };

 vapi.on("error", (e) => {

   console.error(e);

   vapi.stop();

   setIsListening(CALLSTATUS.CALLSTOP);

 });

 vapi.on("call-end", () => {

   vapi.stop();

   console.log("Call has ended.");

   setIsListening(CALLSTATUS.CALLSTOP);

 });

 vapi.on("speech-start", () => {

   setIsListening(CALLSTATUS.SPEAKING);

   console.log("Assistant speech has started.");

 });

 vapi.on("speech-end", () => {

   setIsListening(CALLSTATUS.LISTENING);

   console.log("Assistant speech has ended.");

 });

 vapi.on("call-start", () => {

   setIsListening(CALLSTATUS.CONNECTING);

   console.log("Call has started.");

 });

 return (

   <div className='assistance-Wrapper'>

     <img src={ellipse} alt='ellipse' className='ellipse' width={20} height={20} />

     <img src={polygone1} alt='polygone' className='polygone1' width={20} height={20} />

     <img src={polygone2} alt='polygone' className='polygone2' width={20} height={20} />

     <img src={star1} alt='star' className='star1' width={20} height={20} />

     <img src={star2} alt='star' className='star2' width={20} height={20} />

     <div className='header'>

       <div className='logo'>CA's Assistant</div>

       {/* <button>Talk to Meera</button> */}

     </div>

     <div className='assistance-content'>

       <div className='assistance-container'>

         <div className='title-header'>

           <h2>Meera AI</h2>

         </div>

         <div className='assistance-controler'>

           <div className='assistance-img'>

             {/* <img src={assistanceImg} alt='assistanceImg' width={224} height={213} /> */}

             <div className='lottie-wrapper'>

               <Lottie

                 loop={true}

                lottieRef={lottieRefs}

               animationData={siriAnim}

               height={80}

               width={80}

             />

             </div>

           </div>

           <h2>

             {

               isListening == CALLSTATUS.VOID ? "I'm Meera, you can call me!" :

                 isListening == CALLSTATUS.CONNECTING ? "Calling to Meera..." :

                   isListening == CALLSTATUS.SPEAKING ? "Meera is speaking..." :

                     isListening == CALLSTATUS.LISTENING ? "Meera is listening..." :

                       isListening == CALLSTATUS.CALLSTOP ? "Call Ended!" : ""

             }

           </h2>

           <div className='btn-wrapper'>

             <button onClick={startCall}> <img src={sound} alt='sound' width={24} height={24} /> Start Call</button>

             <button onClick={stopCall}>  <img src={sound} alt='sound' width={24} height={24} /> End Call</button>

           </div>

         </div>

       </div>

     </div>

   </div>

 )
This code is a React component named MeeraAssistance that provides an interface for interacting with an AI assistant named Meera. It uses the @vapi-ai/web library to handle the communication with the AI assistant.
The component imports several SVG images and a Lottie animation file. It also imports the Vapi class from @vapi-ai/web, and the useState and useRef hooks from React.
A new Vapi instance is created with a public API key. An enumeration CALLSTATUS is defined to represent the different states of a call: VOID, CONNECTING, LISTENING, SPEAKING, and CALLSTOP.
The MeeraAssistance component maintains a state variable isListening to keep track of the current call status. It also has a ref lottieRefs to reference the Lottie animation.
Two functions startCall and stopCall are defined to start and stop the call with the AI assistant. These functions update the isListening state and call the start and stop methods on the Vapi instance.
Event handlers are set up on the Vapi instance to handle various events such as error, call-end, speech-start, speech-end, and call-start. These handlers mainly log messages to the console and update the isListening state.
The render method of the component returns a JSX structure that includes several images, a Lottie animation, and two buttons to start and end the call. The text displayed in the component changes based on the current call status.
In summary, this is a React component that provides a user interface for interacting with an AI assistant. It uses the @vapi-ai/web library to handle the communication with the assistant, and it provides visual feedback to the user based on the current status of the call.
In the end, Monika’s initiative to streamline her chaotic days paid off brilliantly. By leveraging Vapi.ai, OpenAI, and Make.com, she created a powerful, automated system that revolutionized how she managed her appointments. No longer bogged down by the minutiae of scheduling, she enjoyed seamless integration between her voice commands and Google Calendar, supported by intelligent workflows that kept everyone informed.
This project not only simplified Monika’s life but also showcased the transformative potential of combining cutting-edge technology with everyday tasks. With her newfound efficiency, Monika could focus more on what truly mattered, whether it was her work, her clients, or her personal life.
Her story serves as an inspiring testament to how modern tools can turn time from an adversary into a steadfast ally. Monika’s journey proves that with the right approach, even the most hectic schedules can be mastered effortlessly.


 30 mins free Consulting
 11 min read
 Canada
 Hong Kong


 Love we get from the world