Quick Summary
Integrating Stripe subscriptions into your Node.js application enables seamless recurring billing for your services. This guide provides a step-by-step approach to setting up Stripe subscriptions using Node.js, covering account creation, product and price setup, customer creation, and subscription management.
Introduction
Welcome to our guide on simplifying subscription management using Stripe and Node.js. If you’re looking to set up subscription plans for your business, you’re in the right place! We’ll walk you through the process step by step, starting from creating a Stripe account to integrating it seamlessly with your Node.js project.
With the power of Stripe’s payment gateway and the flexibility of Node.js, you’ll learn how to set up subscription plans that fit your business model effortlessly. Whether you’re new to online payments or looking to optimize your existing system, this guide covers you. And if you’re aiming for a seamless implementation, it’s always a great idea to hire NodeJS developers who specialize in building efficient and scalable subscription systems.
So, let’s dive in and unlock the potential of subscription-based revenue streams with Stripe and Node.js!
Steps for Stripe Subscription with Node.js
Step : 1 Create stripe account and setup project
- Go to stripe website https://dashboard.stripe.com , register / sign-in to website.
- You will be redirected directly to test mode because there is no business attached with your stripe account. Once you fill your business details you can use stripe in live mode.
- To work with stripe we require API Keys of stripe. Stripe provides two types of API Keys Public Key & Secret Key.
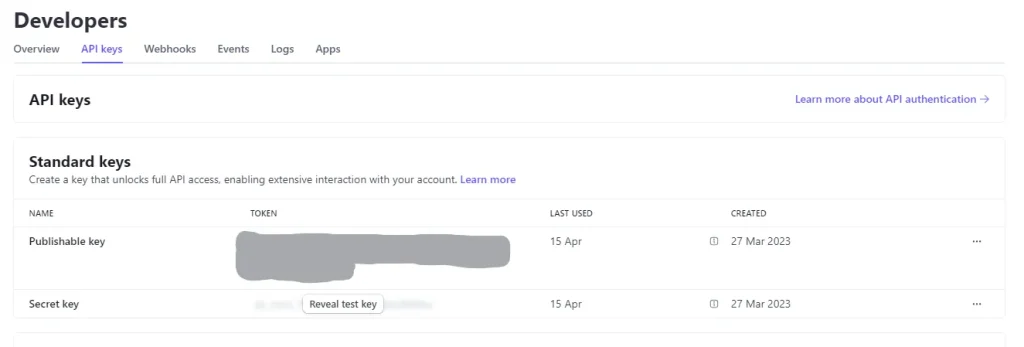
- Public key is visible here to get, secret key you need to click on reveal and enter your password you will get secret key, as Both key is need add them to your project environment variables.
- To work with stripe we need to initialize stripe using secret key.
import { Stripe } from 'stripe';
const stripe = new Stripe(String(process.env.NEXT_PUBLIC_STRIPE_SECRET_KEY));
Step : 2 Create Products in Stripe
- To create subscription model in stripe we need to first create products and then create plans for that products.
import { Stripe } from 'stripe';
const stripe = new Stripe(String(process.env.NEXT_PUBLIC_STRIPE_SECRET_KEY));
const product = await stripe.products.create({
  name: 'Demo',
});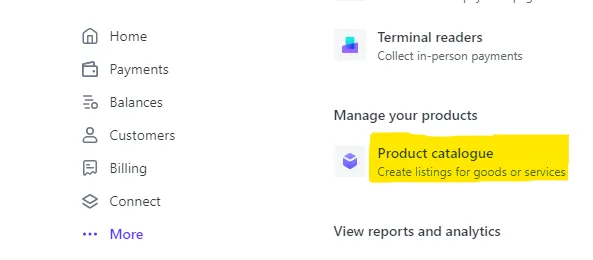
Now you can see your product in the product catalogue.
Step : 3 Create Plans in Stripe
Now we will create a plan for that product
import { Stripe } from 'stripe';
const stripe = new Stripe(String(process.env.NEXT_PUBLIC_STRIPE_SECRET_KEY));
 const plan = await stripe.plans.create({
   currency: 'INR',
   interval: 'month',
   nickname: 'Demo',
   product:  product.id,
   amount: 500,
   usage_type: 'licensed'
 });
In this plan we need to specify currency, interval, amount and product. Be careful while adding amount it always consider Paise that means,
500 = 5 Rs.
100 = 1 $ (So, basically it takes cents as price)
This will create your plan for subscription.
You can use one product to create more than one plan for different intervals like one for month and one for year.
Step : 4 Create Customer-Id and Payment-Method-ID
As we can not store card details of stripe we have to use card element(Provided by stripe) to create payment-method-Id and customer-Id.
Install React Stripe.js and the Stripe.js loader from the npm public registry.
Here we need to use Public key of stripe,
npm install --save @stripe/react-stripe-js @stripe/stripe-js
import {Elements} from '@stripe/react-stripe-js';
import {loadStripe} from '@stripe/stripe-js';
// Make sure to call `loadStripe` outside of a component’s render to avoid
// recreating the `Stripe` object on every render.
const stripePromise = loadStripe(process.env.NEXT_PUBLIC_STRIPE_PUBLIC_KEY);
export default function App() {
  return (
    <Elements stripe={stripePromise}>
      <CheckoutForm />
    </Elements>
  );
};
Stripe provide two hooks useStripe and useElement we use them to create payment-method-id.
import {useStripe, useElements, cardElement} from '@stripe/react-stripe-js';
const CheckoutForm = () => {
  const stripe = useStripe();
  const elements = useElements();
  const handleSubmit = async (event) => {
    const card: any = elements.getElement(CardElement);
   const paymentMethod = await stripe.createPaymentMethod({
        type: 'card',
        card: card
      });
  };
  return (
    <form onSubmit={handleSubmit}>
      <cardElemet/>
      <button disabled={!stripe}>Submit</button>
    </form>
  )
};
export default CheckoutForm;
Above code create payment-method from card store payment-method-Id in database.
This is how your check out form goes ,
Now we need to create customerId
import { Stripe } from 'stripe';
const stripe = new Stripe(String(process.env.NEXT_PUBLIC_STRIPE_SECRET_KEY));

const customer = await stripe.customers.create({
          email: data.email,
          name: data.username,
        });
this will create customer on stripe store customer-Id in DB.
Now we need to connect customer-Id with payment-Method-Id.
import { Stripe } from 'stripe';
const stripe = new Stripe(String(process.env.NEXT_PUBLIC_STRIPE_SECRET_KEY));

const attachedPaymentMethod = await stripe.paymentMethods.attach(
        paymentMethodId,
        {
          customer: customerId,
        }
      );
Step : 5 Set Web Hook with Stripe
Web hook is to keep track of all activities occurred in stripe. We are creating it know but you can create it early on to track activities like customer creation , product creation etc.
To set web hook with stripe you just need to go in developer tab in that webhooks tab.
You can find two option Hosted endpoints Or Local listeners. Hosted endpoint is for live website and Local Listener is for local project.
To add Local listeners we need to download CLI of stripe. Local Listener
To add Live endpoint click on add endpoint then enter Endpoint URL select events for which you are creating this webhook, and press add endpoint.
Your webhook is created you will provided with EndpointSecret
import { Stripe } from 'stripe';
const stripe = new Stripe(String(process.env.NEXT_PUBLIC_STRIPE_SECRET_KEY));
app.post('/', async (req, res) => {
  if (req.method === 'POST') {
    const sig = req.headers['stripe-signature'];
    const endpointSecret = process.env.NEXT_PUBLIC_STRIPE_WEBHOOK_PUBLIC;
    let event;
    const body = req.body;
    try {
      event = stripe.webhooks.constructEvent(body, sig, endpointSecret);
    } catch (err) {
      console.error('Webhook signature verification failed.', err);
      return res.status(400).end();
    }

    switch (event.type) {
      case 'customer.subscription.created':
       //Handle customer subscription created event
      case 'invoice.paid':
        // Handle invoice paid event
        break;
      case 'customer.subscription.deleted':
        // Handle subscription deleted event
        break;
      default:
        console.warn('Unhandled event type:', event.type);
    }
    return res.json({ received: true });
  }
  res.setHeader('Allow', ['POST']);
  return res.status(405).end('Method Not Allowed');
});
module.exports = app;
Step : 6 Create Subscription for selected plan
It is the final step to create subscription all set up is done,
import { Stripe } from 'stripe';
const stripe = new Stripe(String(process.env.NEXT_PUBLIC_STRIPE_SECRET_KEY));
subscription = await stripe.subscriptions.create({
              customer: data.customerId,
              default_payment_method: data.paymentId,
              off_session: true,
              items: [
                {
                  plan: planID
                }
              ]
            });
Your subscription is created you can handle events in webhooks for stripe.
Conclusion:
In this guide, we’ve learned how to make subscription management smooth using Stripe and Node.js. From setting up a Stripe account to creating products and plans, we’ve covered it all. We’ve also explored how to handle customer interactions securely and efficiently.
Now equipped with these tools, you’re ready to dive into the world of subscription-based services with confidence. By combining the power of Stripe and the flexibility of Node.js, you can streamline your business operations and create lasting relationships with your customers.
So, go ahead and explore the possibilities! With Stripe and Node.js by your side, the sky’s the limit for your online business.
FAQs on Stripe Subscription with Node.js
1. How can I handle subscription upgrades or downgrades?
Ans: To modify a customer’s subscription, use the stripe.subscriptions.update method with the new price ID. Be mindful of proration, which adjusts billing based on the time remaining in the current billing cycle. You can control proration behavior using the proration_behavior parameter. Refer to Stripe’s Subscription Update documentation for detailed guidance.
2. How do I implement free trials for subscriptions?
Ans: When creating a subscription, you can specify a trial period using the trial_period_days parameter. This allows customers to use your service without immediate charges.
3. How do I add items to my Stripe subscription?
Ans: You can add items to an existing subscription using stripe.subscriptions.update(), adding new items with the corresponding price IDs.
4. Can Stripe be used for subscriptions?
Ans: Yes, Stripe provides a robust subscription billing system, allowing businesses to manage recurring payments with features like trials, proration, and automatic invoicing.


 30 mins free Consulting

 7 min read



 Love we get from the world